🚀 From Google Podcasts to Moon FM in No Time: Your Hassle-Free Migration Guide
👉

A podcast for practical kitchens
This week I do a little brain dump about saffron, a treasured ingredient that feels fitting for spring. How to buy, what to cook with it, and so on. Plus an easy saffron recipe. Ambient noise of the week: subway. (Sorry.)
Frying Pan Food Adventures — fantastic walking tours of Dubai, on semi-hold right now, due to lockdowns, but they have a podcast too, so you can live vicariously!
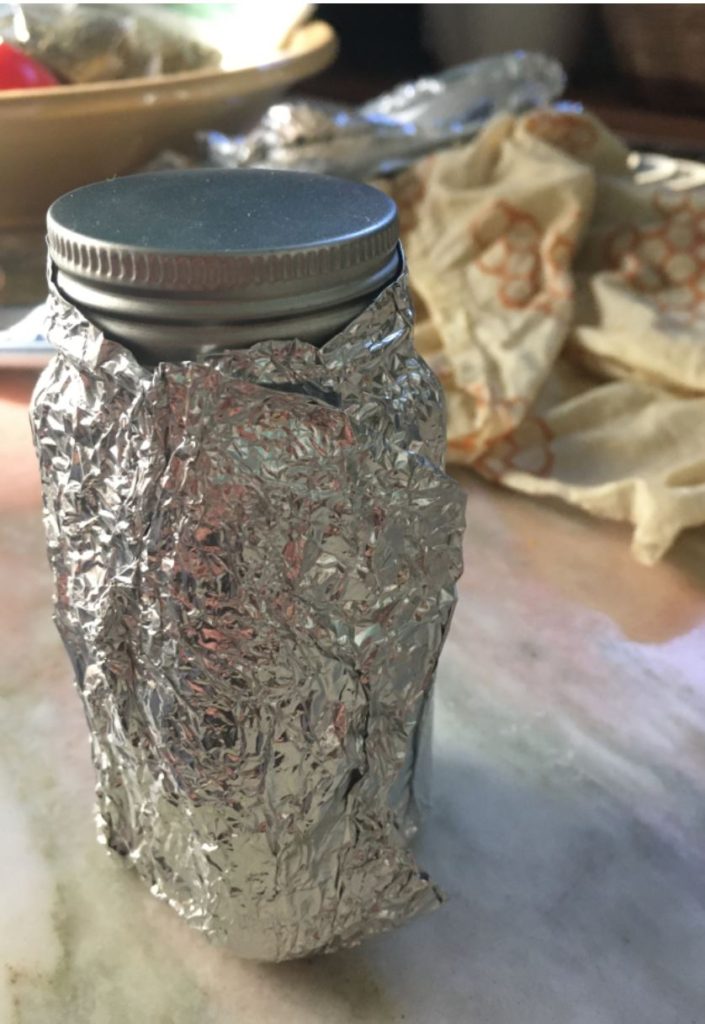 Saffron all wrapped up to keep the light out
Heray Spice — where I recently bought my ridiculously huge load of saffron, though I see that they sell only through Amazon now, which is less ideal. Still, quality is high.
League of Kitchens — love these online cooking classes! Mab’s Persian class was wonderful.
Persia — cookbook by Naomi Duguid with a lot of good saffron recipes and general guidance.
The Art of Eating — fantastic food magazine, really focused on why certain things taste the way they do. Incredibly educational and well edited.
Chard Stalks with Anchovies — the original Provençal recipe as published in The Art of Eating, which through my inattention and outright laziness turned into…
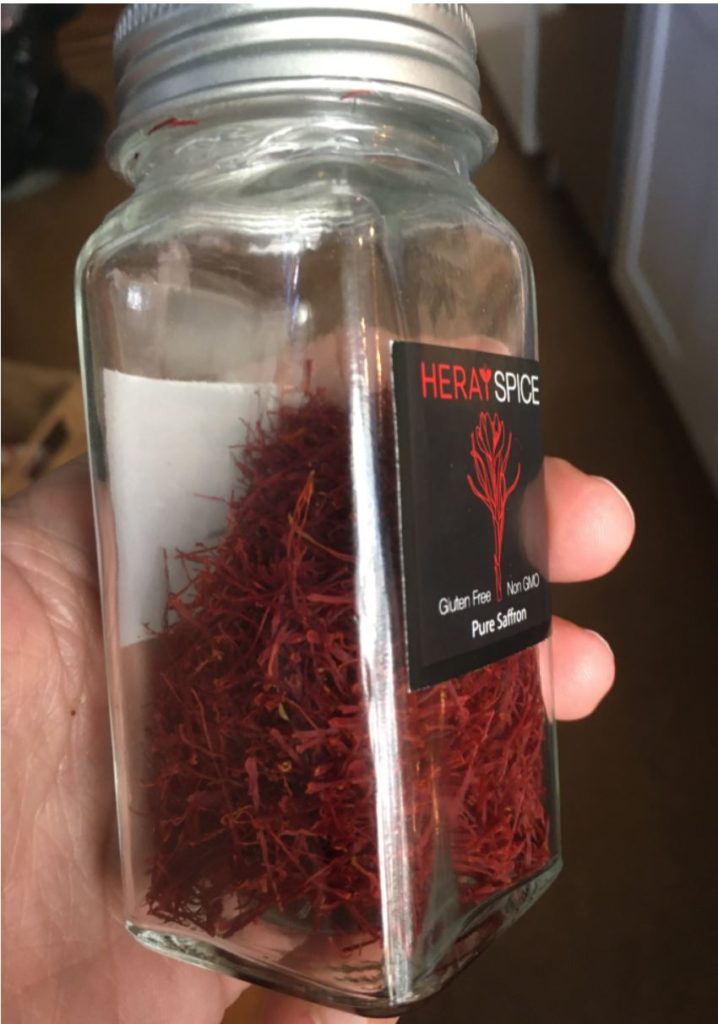 Approximately 7g of saffron. Enough for a while!
Turn on your oven to 350-400 — heat depends on how much else you’re cooking and how fast you want this to go.
From a big bunch of chard, cut out the stems — I do this with scissors, folding the leaf onto itself so the stem is kind of the exposed spine, and cutting through the double layer of leaf to remove the stalk. Fine if it’s not super-precise, and you get a little green on the edges.
Rinse your stems well. Don’t cut them more yet, as they start to oxidize.
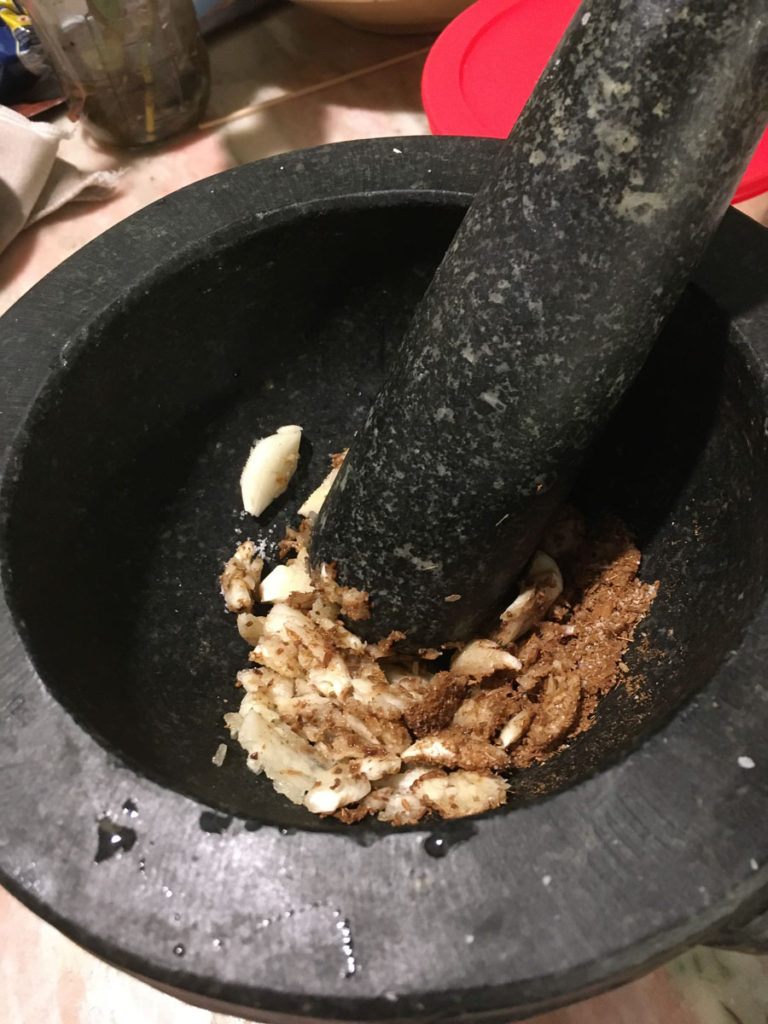
Crush up a couple of garlic cloves — I like mine chunky. If you have salt-packed anchovies, rinse them and bone them. Or use oil-packed anchovy fillets — one or two, depending on your taste — or the equivalent squeeze of anchovy paste. Heat a little glug of olive oil or butter in a skillet and stir and fry your anchovy and garlic, just so the anchovy melts a bit and the garlic is fragrant.
Add a pinch of saffron threads (six or so? eight? not a lot) and stir those around just until you can smell the saffron. Take the skillet off the heat. (If you have saffron water made, the way I describe in the episode, you can stir it in to the half-and-half instead.)
Now trim your chard stems — cut off the brown ends, and I like to cut mine into, say, two-inch lengths, on the bias. They look like fancy little tiles, and they fit on your fork better than whole long stems!
Put the chard stems in a shallow baking dish — ideally something with a lid, and wide enough that the chards stems are not more than a double layer in the bottom. More like a single solid layer, maybe with a few more pieces on top, is ideal.
Pour the garlic/anchovy/saffron oil over and stir a little to combine. Add a few big glugs of half-and-half (or cream) to the dish. You don’t need to cover the chard stems — but about halfway up is good. Salt and pepper here too, but go easy on salt, as the anchovy has already added a bit.
Cover the dish (use foil if you don’t have a lid) and bake for about 20 minutes. Check the stems — if they’re turning tender, you can take the lid off and let the liquid bake down, another 20 minutes or so. If not so tender yet, let them cook covered until they are. This may be a little trial and error, but that’s OK.
The dish tastes good hot, but also at room temperature — so timing pressure is less.
Your host is a little spaced out this week, but luckily it’s a quick and easy meal, learned from a Syrian doctor and single mom: a fast way to get all the satisfying flavor of much more labor-intensive stuffed squash. Pair it with rice and yogurt for an easy lunch or dinner.
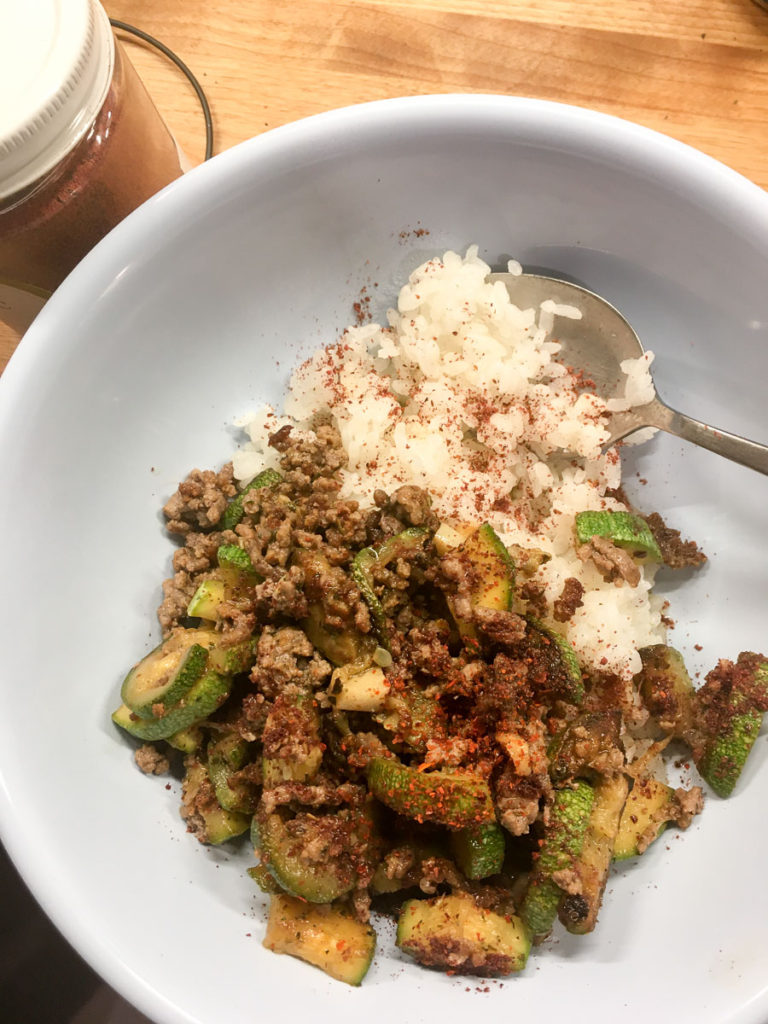 Yup, meal in a bowl, and no shame in that.
This is a super-shortcut, weeknight version of stuffed squash. For that dish, traditionally you’d use koosa, which is a kind of bulbous squash that gives you a bit more to core and stuff. It’s sold in my NYC market as “gray squash” or “Mexican squash.” (There’s a photo at the bottom for reference.) If you can’t find that, of course, for this recipe, you don’t need to core anything, so ordinary zucchini is fine as well.
In the podcast, I say I’m going to make a little yogurt-cucumber salad…and then I just don’t bother! I figured it’s a little redundant, because cucumber is basically squash, and there’s already dried mint in the dish. But if you want it, here’s a recipe/description (scroll down).
But if you want to make this a slightly more elaborate meal, you could do two things: 1) nice rice, like a basmati rice with a little butter, and maybe some onion, and 2) yogurt with a bit of salt, garlic and dried mint, to better approximate the sauce you’d usually get with the proper stuffed koosa.
One more thing I sometimes do (not mentioned in the podcast) is cook the meat and squash with a bit of goat butter. Only because we happen to have it! Adds some nice funky richness.
For 3-4 portions, with rice
4 or 5 garlic cloves
Olive oil
3/4 pound ground lamb or beef
2 large pinches ground allspice
Salt and pepper
4 gray squash
2 even larger pinches dried mint
Aleppo pepper or other red chile flakes, totally optional
Juice of half a lemon
Ground sumac
Peel and roughly chop the garlic.
In a large skillet, add a tiny bit of olive oil and fry the ground meat with a bit of salt, breaking it up with a spoon. Midway through, add the pepper, allspice and the garlic. (Or…if you space out like I did in the podcast, you can add the spices to the meat later, and fry the garlic with the squash!) Stir and fry until it’s good and brown and crumbly, and most of the liquid has cooked away. Scrape the meat and all the browned bits into a large bowl (you’ll be adding all the cooked zucchini in here later).
While the meat is browning, trim the ends off your squash and cut into thin half-rounds. (Slice in half vertically, then line up the halves and slice through — quarter-inch slices are fine.) If you have very thin zucchini, no need to slice in half, although they’re easier to manage with a flat cut surface.
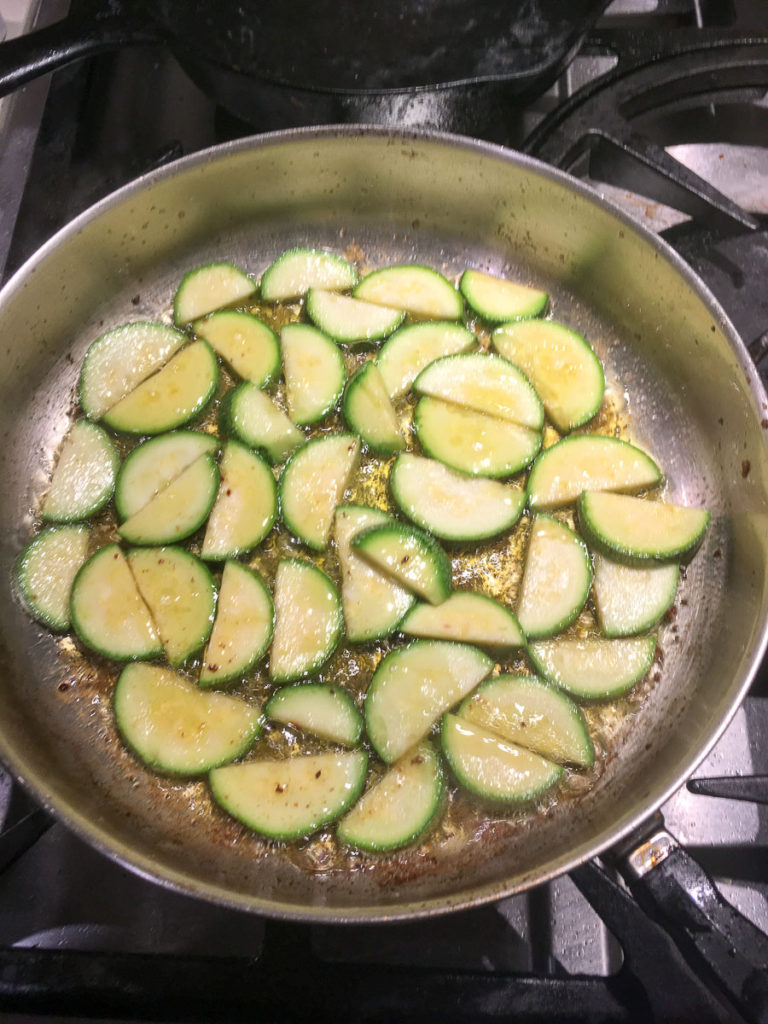 Go with this single-layer approach to frying if you want more browning and less mush.
In the same pan as the meat, add a little more olive oil and fry the squash. If you want them a bit brown, do them in two batches. If you want them a bit softer (and possibly done faster), throw them all in at once. You can even put the lid on for a bit, so they steam through. When they’re close to done, add the dried mint, crushing it with your fingers to release the oils.
Combine the fried squash with the meat and stir. Squeeze over the lemon juice and taste. You may want more salt (the squash can always absorb a lot). You can add chile here too if you like.
Serve over rice, with a generous amount of sumac, if you have it.
This is koosa, aka gray squash. They’re about 5-6 inches long.
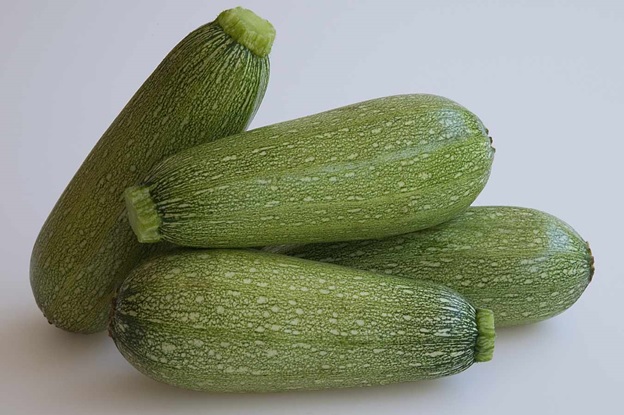 Photo borrowed from the internet. Thank you, internet!
Here (PDF) is an essay I wrote about this quickie squash recipe back in 2016 — along with a recipe for proper koosa mahshi, as I learned to make it in Aleppo.
Here’s more about The Five Obstructions, which I don’t explain very well on the podcast, but the premise is a filmmaker having to remake his own film according to some super-strict parameters. I am a big fan of super-strict parameters, in service to creative output!
And here’s more about Dogme 95, which is my whole excuse for not making a super-tricked-out podcast. Man, I used to watch so many more movies than I do now. Sigh.
A short episode, for a very simple but surprisingly satisfying vegetable dish, optionally made heartier with lentils. From the Aegean coast of Turkey — but, honestly, from the Turkish Airlines inflight magazine! Eat as a side dish, or as a full meal with rice and a little yogurt-cucumber salad.
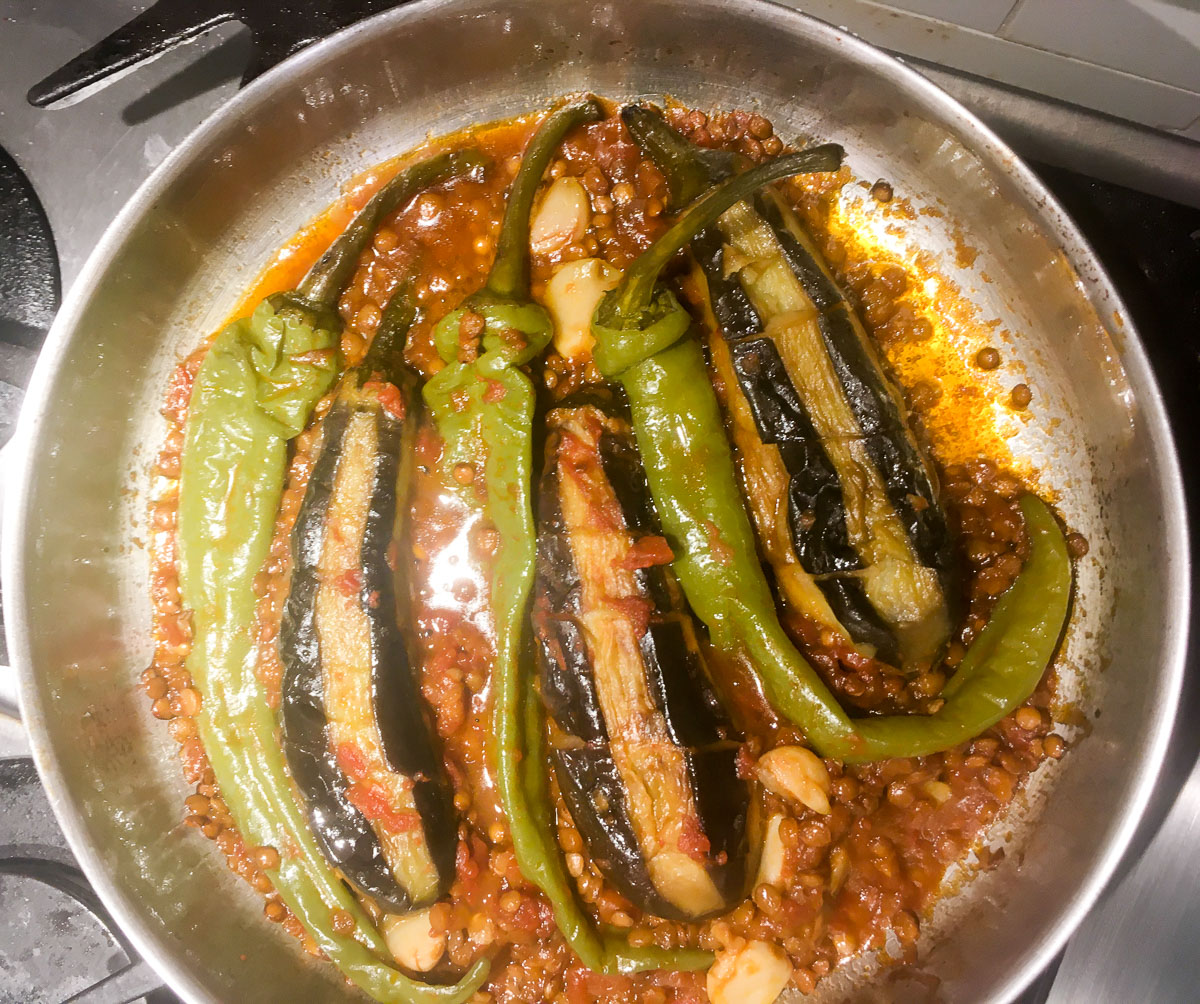 Eggplants and green peppers, all snuggled up nice!
Ideally make this with smaller, slender eggplants, so you can nestle the eggplants and peppers together. Turkish-style green peppers are long and thin and not very meaty — see below the recipe for a photo. They’re usually mild, but occasionally some can have real heat. If you can’t get them, Anaheims would be fine, but they might need additional cooking time. If you can only get a big globe eggplant, then dice it and the peppers — a different shape, but same taste!
Lentils are my addition, totally optional. I make three portions, usually — two for dinner, and one to save.
For more on this style of cooking, see last season’s episode on oil-cooked vegetables.
For 2-3 portions
3 small, slender eggplants
2-3 glugs olive oil
6-8 cloves garlic
3 Turkish green peppers/chiles
3-4 heaping tablespoons crushed canned tomatoes, or equivalent fresh, diced
1/4 cup brown lentils (optional)
Large pinch salt
Rinse the eggplants and pull off the extra bits around the stem — but leave the stem on. Peel the eggplants in long stripes, then make a spiral cut down each one. (The easiest way to do this is set the knife diagonally on the eggplant, then rotate the eggplant.) Be careful not to cut all the way through — you still want a whole eggplant in the end.
 Be generous with your olive oil!
Heat the olive oil in a large shallow pan with a good-fitting lid. Add the eggplants and brown on each side.
While the eggplants are browning, peel the garlic and leave whole. (Fine of course if you end up crunching it a little while peeling it.)
Add the green peppers to the pan (whole, no need to remove stems), nestling them in alternating with the eggplants. Scatter the garlic evenly between the vegetables. Turn down the heat to a simmer and spoon the crushed tomato evenly over the vegetables.
If using lentils, add them around the vegetables (you want them down at the bottom of the pan) along with 3/4 cup water. (Do not add water if not using lentils.)
Cover and cook without stirring until the peppers have collapsed a bit and the eggplant yields when you press it with the back of a spoon (be gentle — you want to be able to put a nice whole eggplant on a plate). If you’ve added lentils, they should be tender and the water should be cooked away. This all takes about 30 minutes.
Serve with rice, each portion getting one whole pepper and eggplant, and a few cloves of garlic.
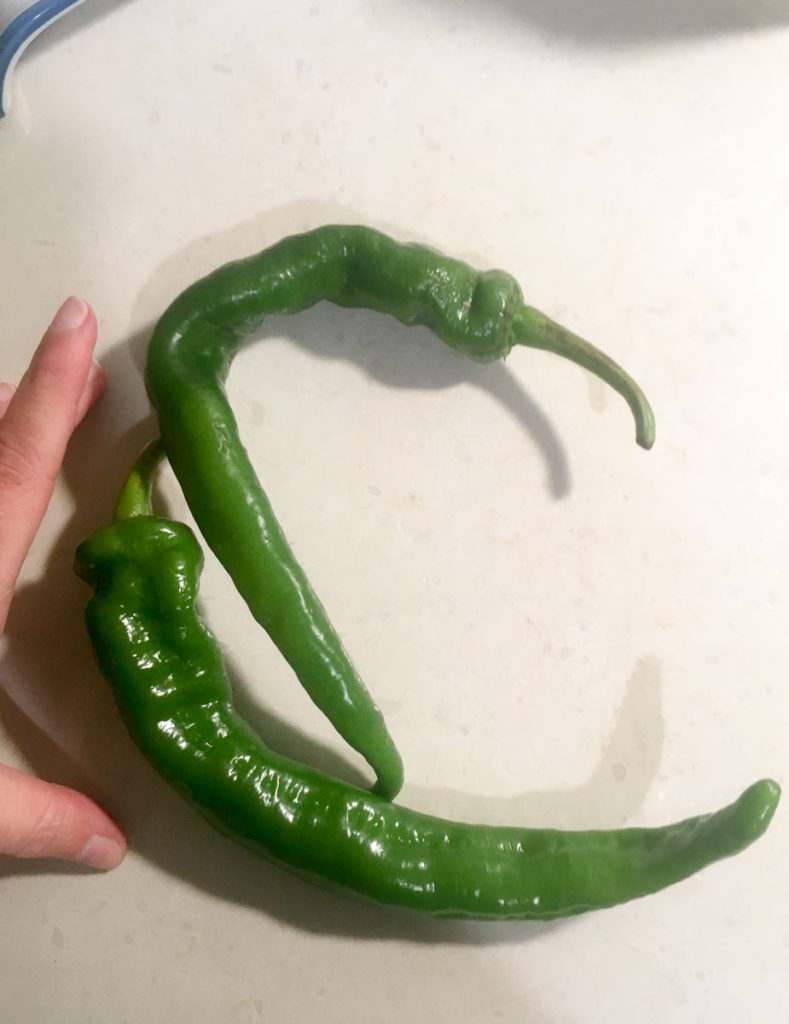 Turkish green peppers, with hand for scale.
Cacık (Turkish Cucumber-Yogurt Salad)
For two portions, use a single midsize cucumber (approximately four inches) and peel it, or use two thin-skinned Persian cucumbers without peeling. Cut into quarter-inch cubes and combine with about half a cup of yogurt. (Sheep’s-milk yogurt is great here!) Crush or very finely chop one medium clove garlic and stir in to salad. Add salt to taste. Finally add a large pinch of dried mint. Crush it between your fingers to make it finer and activate the oils, for more flavor.
Cooking for virtual travel, starting with a little trip to Egypt through koshari, a combo of rice, lentils and pasta, topped with a tangy tomato sauce and crispy fried onions. It’s hearty and nourishing, with garlicky zing. No sides this time, just pickled peppers and fresh cucumbers.
 Koshari: the power meal of Egypt!
As I say in the podcast, this is a real fast-food staple, but it’s also a dish people cook at home. The base is lentils, rice and pasta, topped with tangy tomato sauce and crispy onions. If you want deluxe toppings, you can also add fried vermicelli (gives a nice chewy texture) and/or chickpeas. But honestly, it’s perfectly satisfying this simpler way, and it means fewer pans to wash.
My friend’s mom, who taught me her technique, serves it with pickled peppers and eggplants on the side. In the podcast, I slice up a cucumber too, with salt.
Serves 3-4
1 cup brown lentils
1 cup short-grain rice
5-7 garlic cloves
1 heaping tsp ground cumin
Large pinch salt
2 medium yellow onions
28-oz. can tomatoes (puree, crushed or whole)
2 handfuls tube pasta (elbow mac or shorter cut tubes)
1/2 cup canola oil (approx, for frying)
ground/crushed red chile (to taste, optional)
1 tbsp vinegar (or more, to taste)
 Rice cozy in effect.
Rinse lentils and place them in a heavy saucepan (whatever you ordinarily cook rice in) with 2.5 cups water. Cover and turn heat up to boil, then down to simmer for 5 minutes. Add the rice to the same pot and simmer for another 15 minutes or so. You may have to add a little more water, and if it’s all looking a little too wet near the end, you can leave the lid slightly ajar. If the rice and lentils are done, but everything’s a little sticky, set a clean dish towel over the top of the pot and put the lid on top of that — set aside while everything else is finishing.
 Yes, the garlic can be this coarse. Or you can chop/crush it finer, if you prefer.
Peel garlic and chop or crush in a mortar with salt and cumin. When the rice and lentils are close to done (about 5 minutes out), take a third of this garlic mix and stir it in.
Peel and slice the onions in thin half-rings.
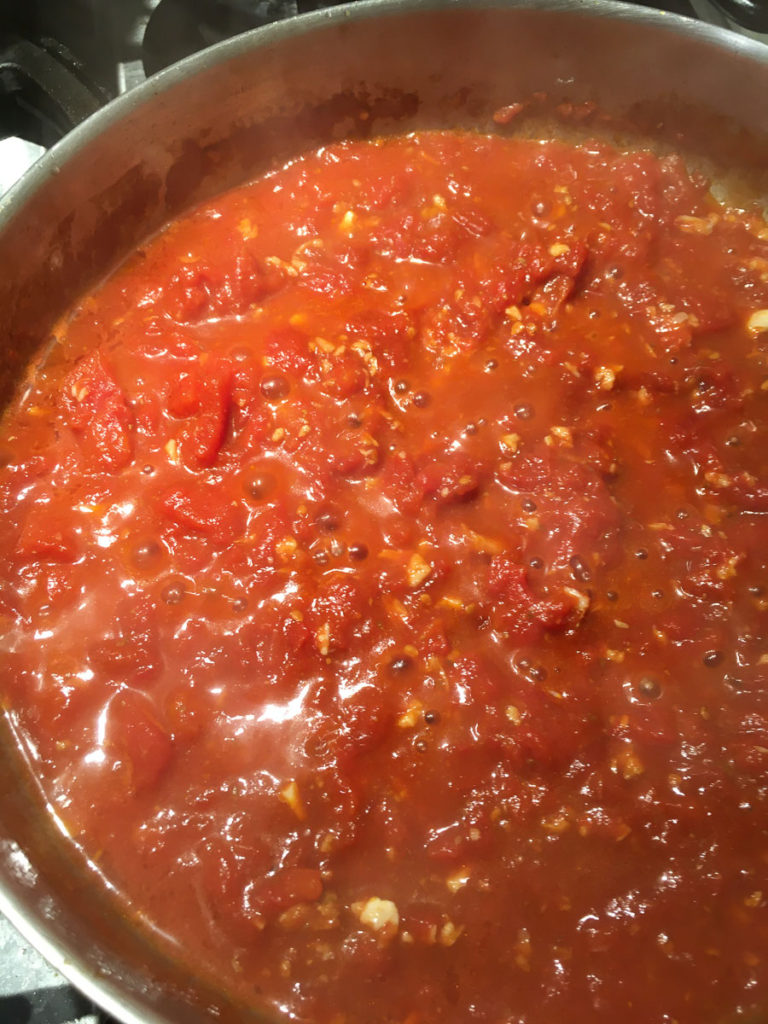
In a large nonreactive saucepan (stainless steel or similar), heat a little glug of the canola oil and add another third of the garlic-cumin combo. Stir briefly, then add the canned tomatoes. If you have whole tomatoes, crush them up with a spoon. Let simmer on medium-low, uncovered. Stir occasionally to check thickness and make sure it’s not sticking.
Set water on to boil for the pasta; salt generously. Add the pasta and cook according to directions, then drain.
In a heavy skillet, heat the remaining canola oil until just shimmering. Add about a third of your sliced onions — a thin layer. Don’t crowd the pan. Stir to keep them moving, and cook until brown on the edges but still a little pale in the center of the slice — they keep cooking after you take them out. Remove with a skimmer and set them on a paper towel to cool. Make sure you get all the bits out before you start the next batch (move the oil off the heat if you have to). Do the remaining onions the same way.
 Note the holes!
The tomato sauce is done when it has thickened nicely. There should be little holes in the surface. Stir in the last third of the garlic-cumin mix and the vinegar, and bring the heat up to high briefly. There should be little holes in the surface of the sauce — this is how you know it’s the right thickness.
Serve in a big bowl: lentils and rice, then some pasta, then some tomato sauce, and crispy onions on top. Pickled vegetables (and I like raw cucumber) on the side.
A bit of a hybrid episode, focusing mostly on how to make a pie crust, plus a little about quiche. There’s a lot of misinformation in pie crust tips and recipes — this episode covers all I’ve learned in three decades.
The recipe is so simple I’ll mention it first:
For 1 crust for a 9-inch pie plate
1 cup all-purpose flour, plus a few more tablespoons for adjusting
1/2 cup butter (1 stick) or a combination of butter and leaf lard, no more than half leaf lard
1/4 cup ice water
Pinch salt, if your butter is unsalted
See the nifty pattern there? Very easy to remember. Now…all the magic is in the technique, which I go into in more detail in the podcast. Here is the short version, and a few photos. At all times, keep the butter/lard as cold as possible, and keep your kitchen cool. If you feel your fingers getting greasy at all, stop and put the whole bowl in the fridge for about 10 minutes.
Measure the flour (and optional salt) into a large bowl. Set aside some flour for use later, when you’re rolling out the dough.
Cut the butter into small cubes.
Toss the butter and the flour together, then pick up each piece of butter and quickly squish it flat between your thumb and fingers. (Use both hands to make it go faster.)
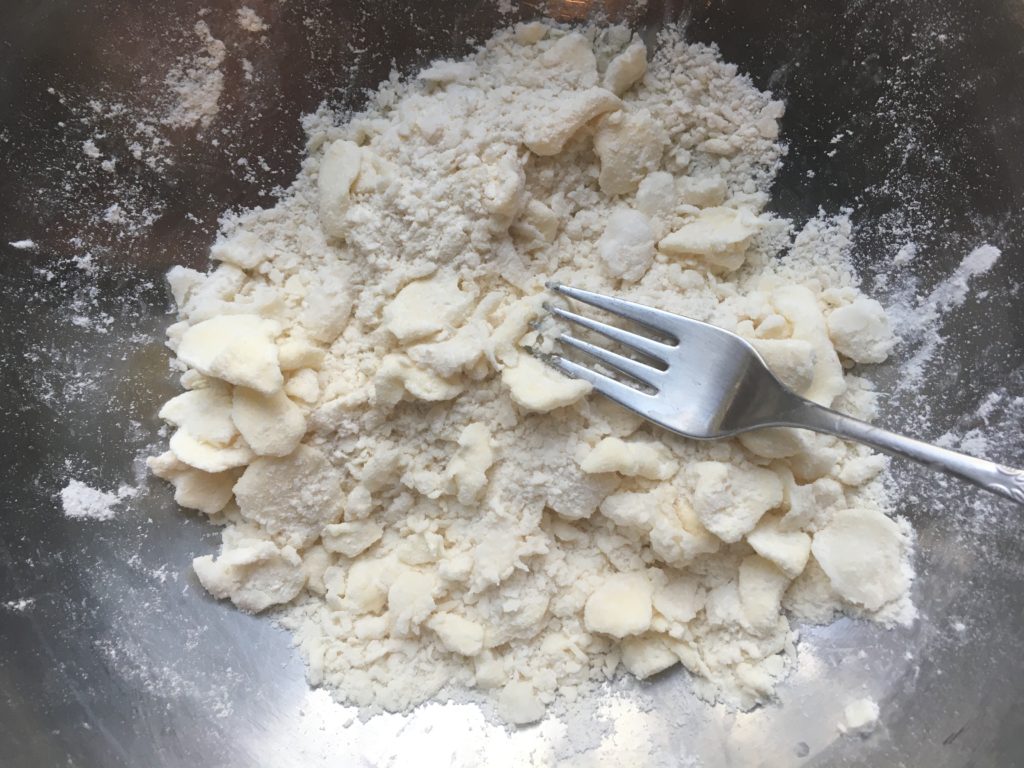 This is the texture you’re going for with the squished butter.
When all the butter has been squished, wash your hands. Possibly put the butter-flour mix back to chill, if it felt like the butter was getting too soft.
Slowly drizzle in about half the cold water and stir the mixture with a fork to distribute the water.
Drizzle in more water, very gradually, and stir gently. The mixture will start to clump together. You will need to assess whether the dough is fine as is, or if it needs all the measured water (most common). The dough should look fairly moist, but it should not be sticky (a sign you added a bit too much water). If you’re baking in a dry climate, or depending on your flour, you may even need a smidge more water than 1/4 cup, but this is rare.
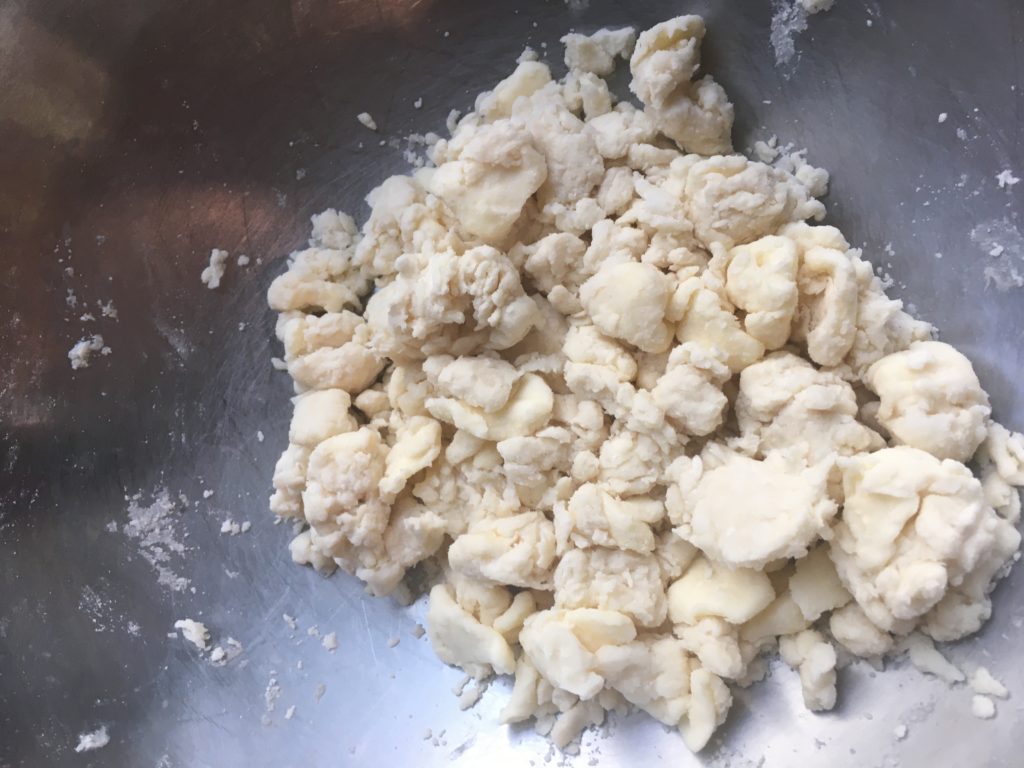 This is the texture you’re looking for after adding enough water.
Gently scoop the dough together and press it into a ball — does it hold? Don’t try to force it much, or your hands will warm the butter. If it’s too dry, it will fall back in pieces in the bowl, and you’ll need to add a tiny bit more water — really, a teaspoon at a time. If in doubt, chill again.
Once you have a dough that holds together in a ball, cover it with a plastic bag or a bowl and stick it in the refrigerator again. You can hold it like this for hours, if you want. Half an hour is usually enough. (Take this time to get your quiche filling together.)
I don’t have photos for rolling out, but it’s described fairly well in the podcast. Key tips are to knock the ball flat with your rolling pin first, before you actively start rolling. You’ll also want to press together the cracking edges a bit.
Roll evenly up and back on a floured surface. After one up-and-back, rotate the dough a quarter-turn or so. If it sticks, dust a little more flour under it (and don’t forget some on the rolling pin too!).
You can measure by setting your pie plate in the center — you want a couple of inches all the way around. But you don’t want the crust much more than 1/8-inch thick.
To get the crust into the plate, fold it in half gently, then (optionally) in half again. Lay it in the plate, centered, and unfold gently.
Then comes the shaping. I usually do a fluted edge, pictured here. You can also fold the crust under all around and lightly press it with a fork.
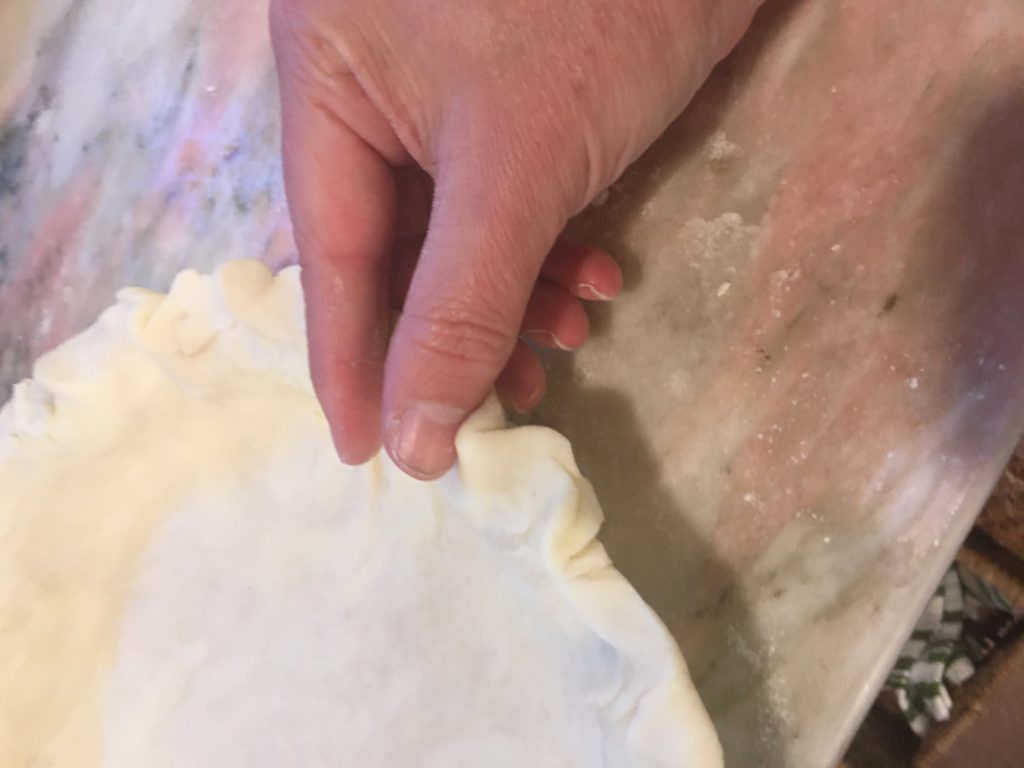 This is my technique. It’s up to you!
When this is all done, put the pie crust back in the refrigerator to chill. Uncovered is fine, if you’re baking soon. Otherwise, cover it with a plastic produce bag so it doesn’t dry out.
I’m not a big fan of pre-baking (blind baking), as I say in the podcast, but it’s possible. If you do, you want to set parchment paper inside the crust and fill it with dried beans, to keep the bottom from bubbling up.
(TBH, I always have trouble with my edges slumping down into the plate, which is part of the reason I rarely mess with pre-baking!)
 Ready to go in the oven…
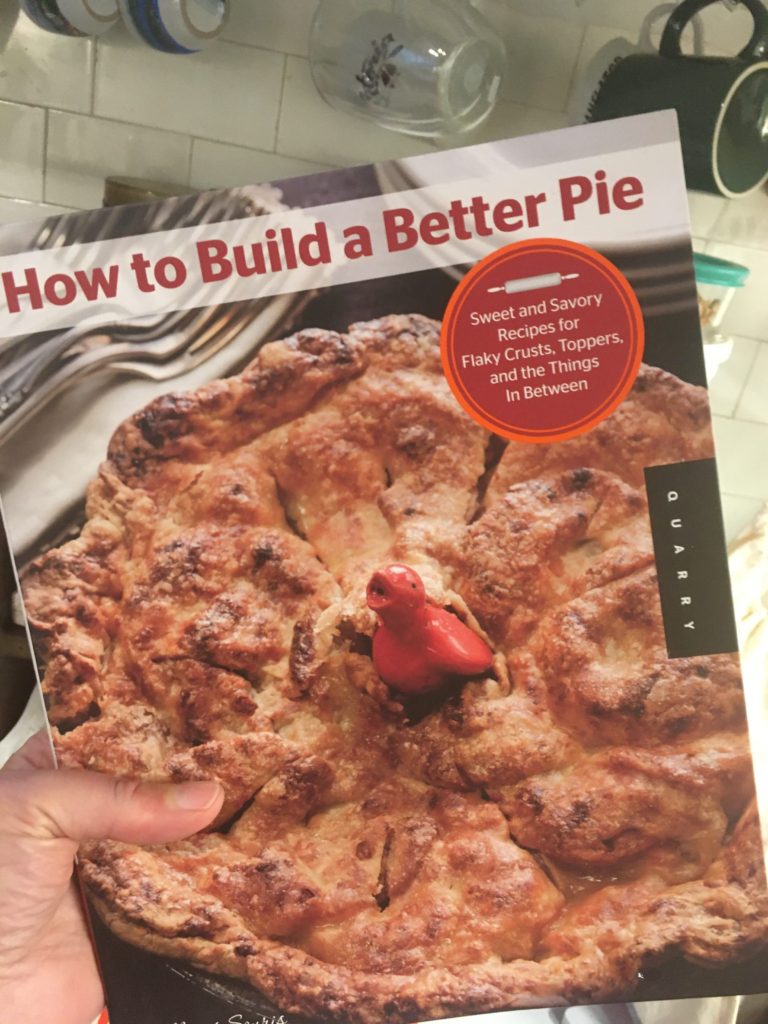 This is it! It’s what everyone should read if they need more pie knowledge and inspiration!
Finally, let me give a shoutout to the book I mention in the podcast, How to Build a Better Pie, by Millicent Souris. Having eaten many of Millicent’s pies back when she cooked at Queen’s Hideaway, I can vouch for Millicent’s talents and knowledge, and the detailed photos and real talk in the book are ideal for a beginner to see every single step in making a pie crust.
The finished pies are also refreshingly homemade-style, and not all Insta-perfect. The catch: it may be out of print, as it is not available through my usual affiliate, but a quick search reveals copies for sale!
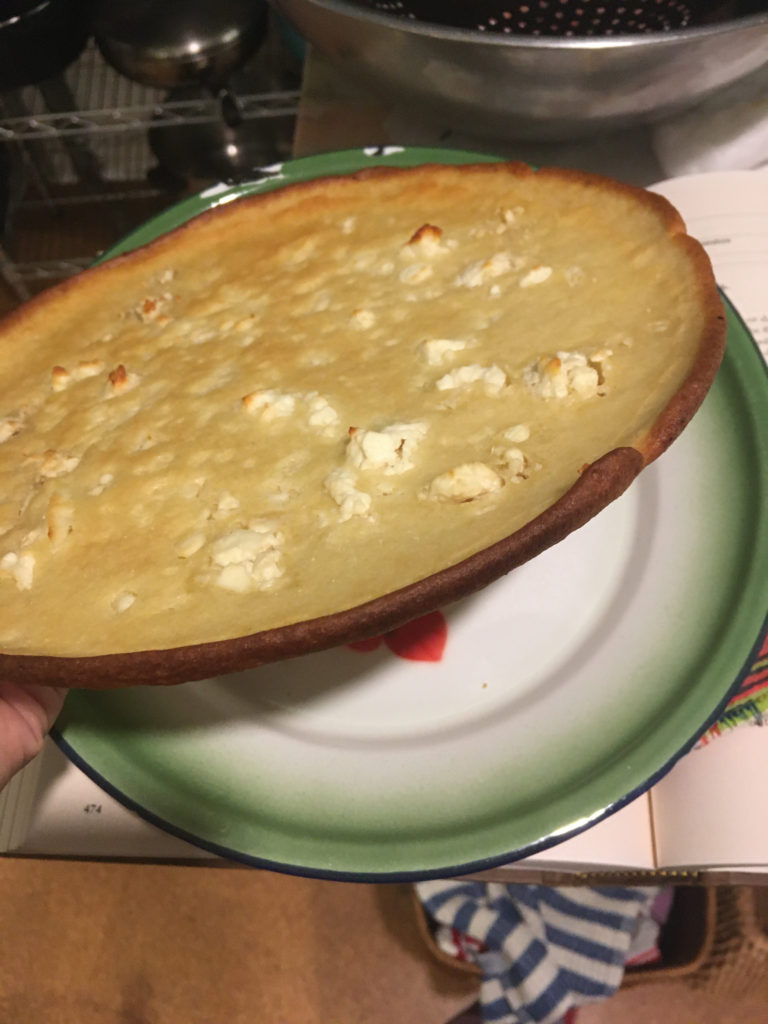
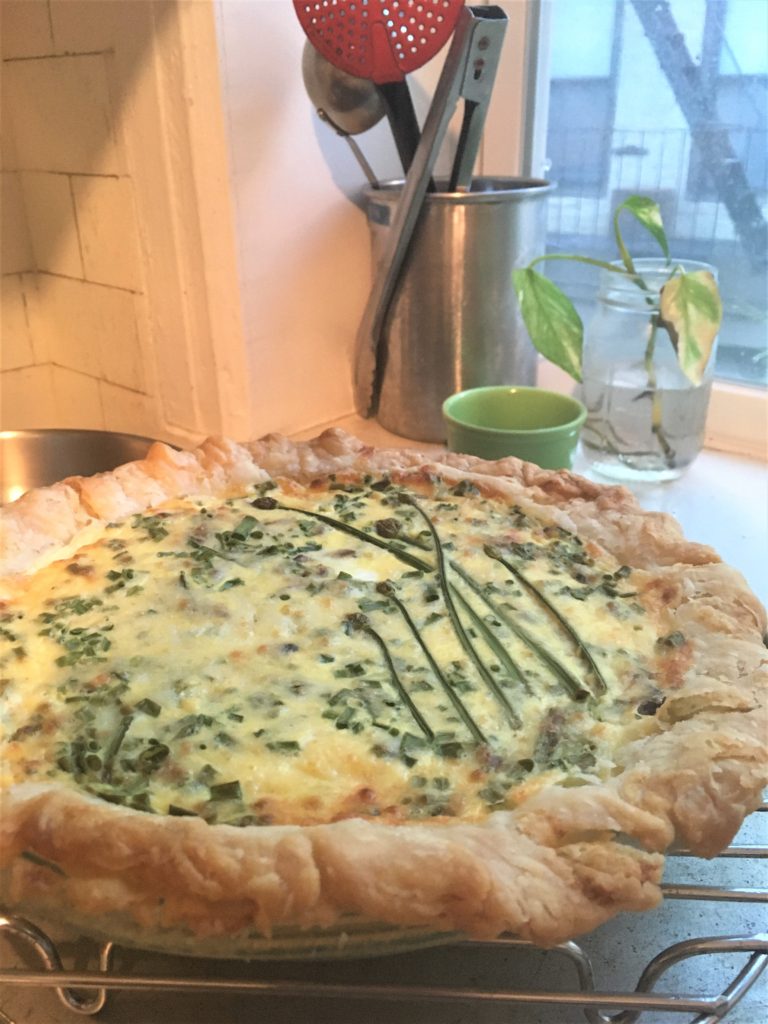 Golden brown!
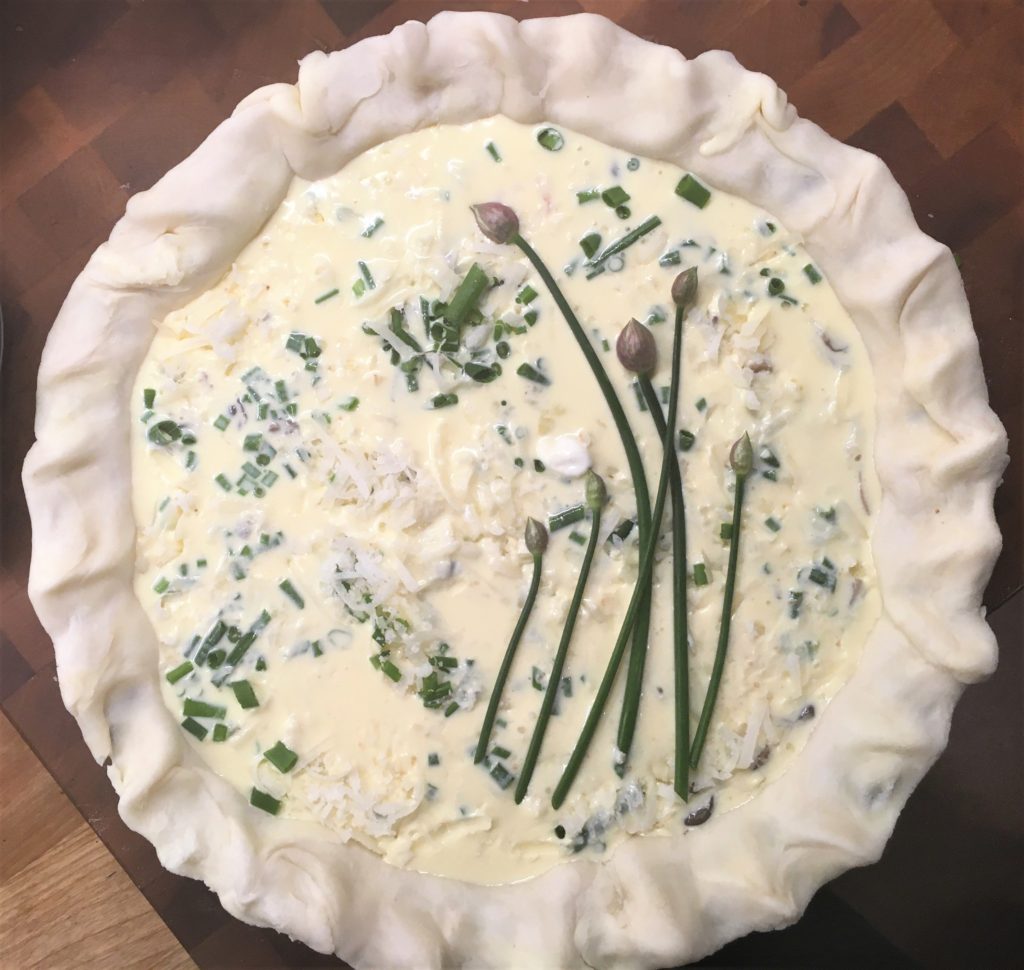
I consider quiche a semi-fancy way to use up little bits of vegetables and things in my refrigerator. Some of the best combinations have been one-offs that I never seem to be able to recreate. I give amounts of vegetables, etc, by weight below, but it may be easier just to think in terms of large and small handfuls. For a standard 9-inch pie plate, you need less filling than you think! In the podcast, I used oyster mushrooms, chives and a little manchego cheese.
For one standard 9-inch pie crust, unbaked
3 eggs
1.5 cups half-and-half (or milk and whole cream, or milk and sour cream, or whatever you have to fatten up whole milk)
Salt and pepper
Your choice of fillings, including some or all (by weight):
4 oz. cooked vegetable filling, chopped in small pieces (asparagus, broccoli, mushrooms, etc) or thin strips (greens like kale or spinach)
2 oz. caramelized onions (well cooked, otherwise they can water down the custard)
2-4 oz. cooked bacon or cubes of ham
2-4 oz. grated cheese
Small handful fresh herbs or chives
Grated nutmeg (optional: nice with some flavor combos, such as spinach and bacon)
After your pie crust is prepared and chilling, preheat the oven to 450. (If you’re using a baked pie crust, set oven to 375.)
Whisk the eggs and milk/cream together until the eggs are well incorporated. Add a bit of salt and pepper (less salt if using salty cheese, more salt if using no cheese).
Layer the fillings in the crust (add some herbs in the bottom first, to be held down by the other fillings, so they don’t all float to the top), grate in about half the cheese, and then give the egg mixture a good stir and pour it over. Scatter the remaining cheese on top, and grate on nutmeg (if using).
Bake at 450 for 10 minutes (this is to bake the bottom crust a bit), then turn the heat down to 375 and bake until done, another 30 minutes or so. A knife inserted midway between the center and the crust will come out clean. The center will still be a tiny bit soft, but it will set up as it cools. Give it a good hour to cool.
If you don’t finish this in a single meal, you can leave it out, covered (I just put a big bowl over the whole dish), overnight, if the weather isn’t hot. I usually wind up eating the rest by lunchtime. You can reheat slices in a skillet on low heat — which will also crisp up the bottom crust.
Lentils with Moroccan spices are incredibly good and simple, and they stand up to a lot of substitutions. Alongside, a raw beet salad makes a sweet, crunchy counterpoint. Sound quality on this is pretty rough — our kitchen has been inhabited by a mysterious hum!
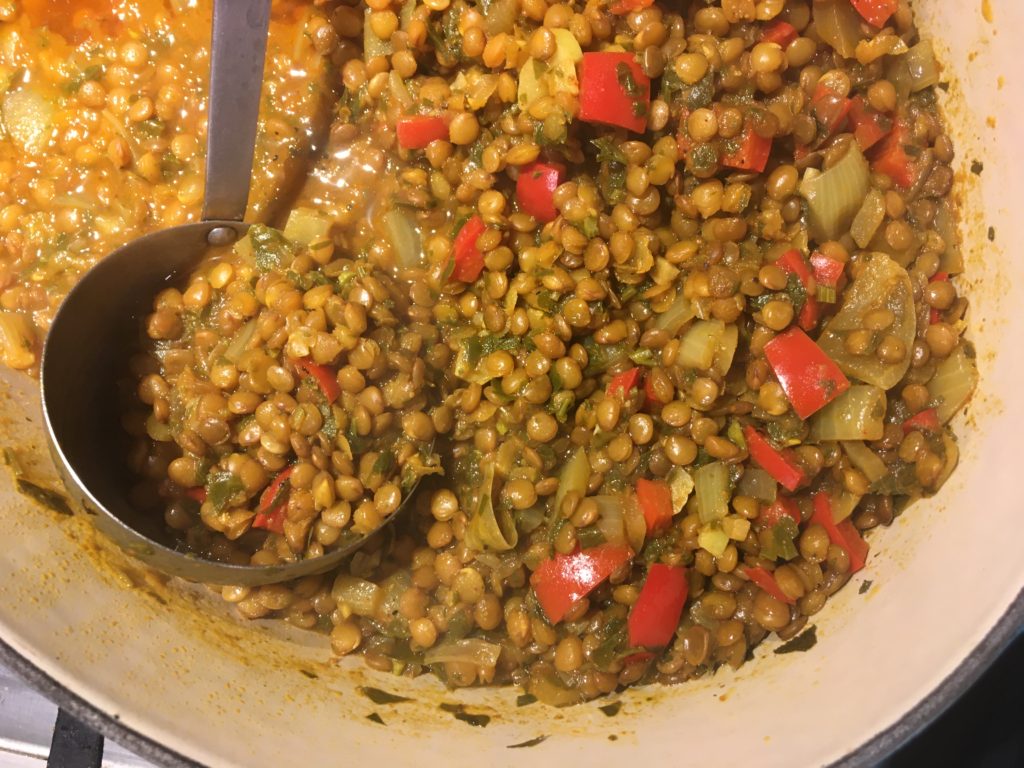 They don’t look like much, but they taste fabulous — trust!
I learned this recipe from Cafe Clock in Fes (though, as I say in the audio, it’s entirely possible I’m not remembering it properly!). It’s a very typical side dish at restaurants and made at home a lot as well. You can do it in a pressure cooker, as most Moroccans do, to make it even faster.
I have made it sometimes without red bell pepper, or without cilantro, without ginger, without onion…it’s always been good! It tastes even better the next day, and it freezes very well, so you could also make a double batch and store some.
Makes 4-5 portions
1 cup brown lentils
1 small onion
4 cloves garlic
1/2 red bell pepper
Large handful each fresh parsley and cilantro (or more — if you need to get rid of some tired herbs)
Olive oil
1 heaping Tbsp tomato paste (or 1 small tomato, chopped, or equivalent canned)
1 tsp powdered ginger
1 tsp ground cumin
1 tsp ground coriander
1 tsp paprika (or less of a spicier red chili)
Salt and pepper
 How fine? This fine.
Rinse lentils and set aside.
Chop a medium onion (rough or fine, your choice) and the garlic. Cut the bell pepper in 1/4-inch dice. Chop the parsley and cilantro together, quite fine.
In a heavy-bottomed pot (preferably not cast iron, because it could react with the tomato past in the recipe), add enough oil to cover the bottom easily. Turn the heat to medium and layer in the ingredients: onion, garlic, red bell pepper, lentils, then herbs.
On top of this, add the spoonful of tomato paste, and then add the spices, spoonful by spoonful. Lay them out one by one, so you can keep track of what you’ve put in. Add salt (a fair amount) and pepper.
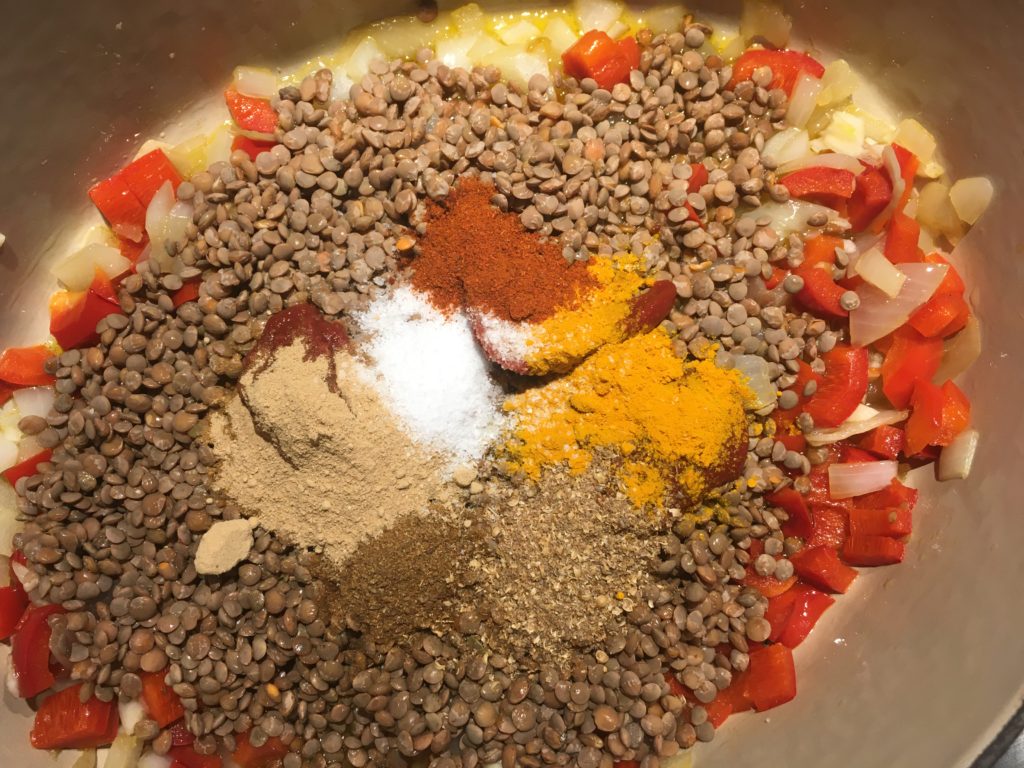 Remember what this looks like!
Add enough water to cover everything by about one knuckle depth. No need to stir — just leave as is and cover.
Turn the heat to medium-low and cook until the lentils are tender but have not lost their shape. This can take anywhere from 20 to 35 minutes, depending on the lentils’ age and type.
Moroccans usually eat this with soft bread, but it goes well with rice as well.
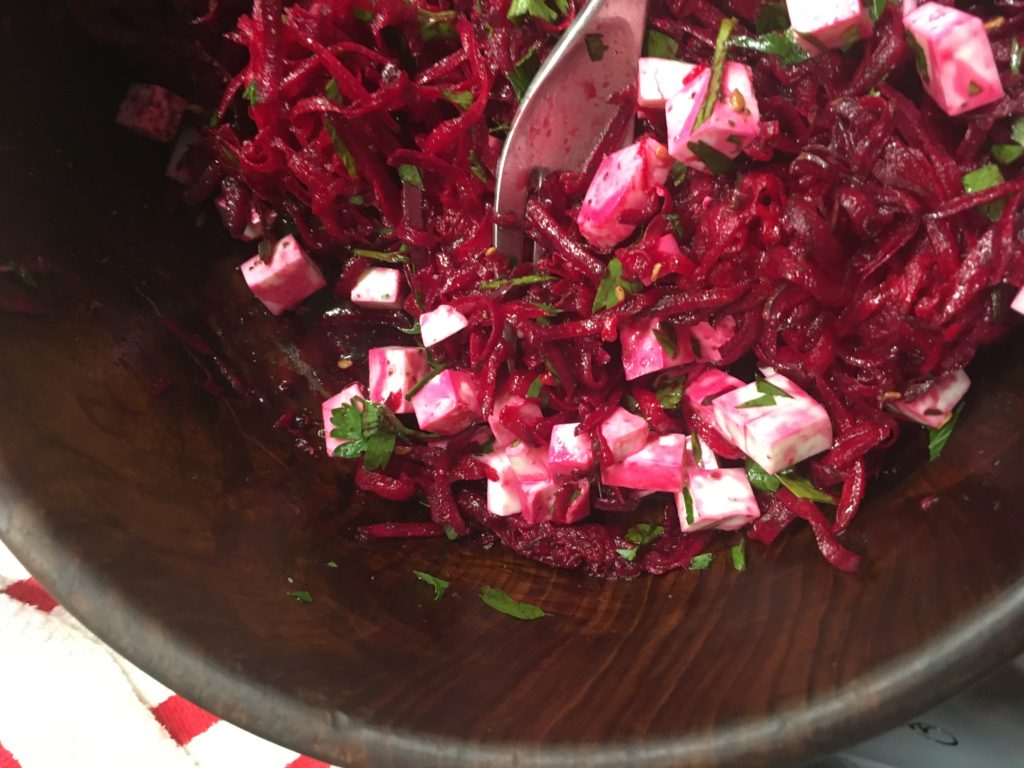 The pink just beginning to spread…
As I say in the audio, I recommend this mostly if you have a food processor. Hand grating a beet is a major pain and can be quite messy. But with a fo-pro, it’s short work.
In this particular preparation, I added a little zaatar, which is totally optional. Black olives are a
**If you don’t have a machine, the easiest way to deal with beets is to roast them whole, unpeeled: put them in a small tray with about a tablespoon of water and a drizzle of olive oil, and then cover them tightly with foil and roast at 400 degrees or so until they’re soft. When they’re cool, the skin will slip right off.
Serves 2, with a bit left over
1 medium beet
1 small clove garlic
~2 Tbsp olive oil
~2 Tbsp cider vinegar
Drizzle of honey
Salt and pepper
~2 oz. mild white cheese (mozzarella, halloumi and feta are all good)
Small handful parsley
Small handful arugula (optional)
Large pinch zaatar (optional)
Wash beet and trim ends (no need to peel), then shred in food processor. Chop the garlic clove very fine or run through a press into a small bowl. Mix in the oil, vinegar, optional lemon juice, honey, salt and pepper. Whisk these together well.
Place the grated beets in a small salad bowl and pour the dressing over and toss to coat.
Depending on the kind of cheese you’re using, cut into small cubes or crumble, and add to the salad bowl. Coarsely chop the parsley and mix in; add the arugula if using.
Add optional zaatar to taste — if you are sensitive to the “dusty” taste of beets, you should go light, or not use it at all, as it seems to bring out that flavor.
Toss all together. Beets can handle sitting for a while in the dressing — so you can make this ahead. But add the herbs later.
Schnitzel, cutlets, tonkatsu, milanesa: thin, breaded pan-fried cuts of meat are fun to make. Serve with a sweet-creamy cucumber salad and buttery potatoes (TBH, a little bit of an afterthought!). Yes, this episode is a sonic nightmare, and we’re slipping behind schedule, but oh well, aren’t we all?
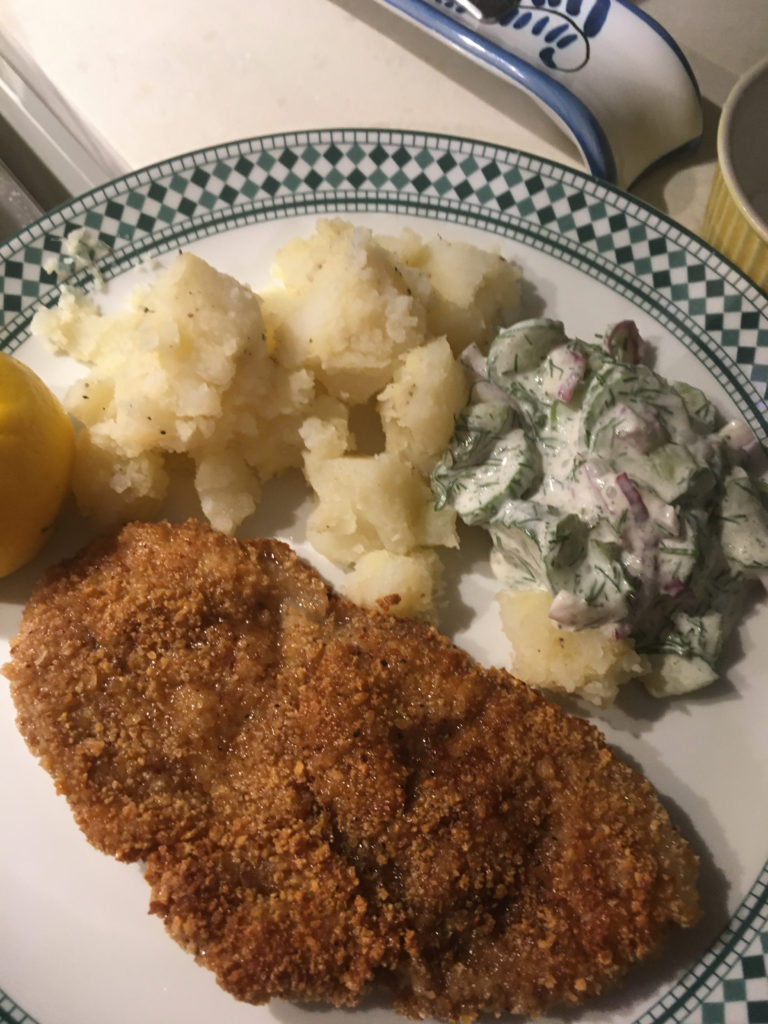 Cutlets / schnitzel / milanesa: delicious no matter what you call them.
What’s not to like about little breaded slices of meat, pan-fried till crispy? They’re good hot, and also nice to have a few extra for sandwiches (Japanese-style on white bread with mayo, or go all out for a Puebla-style cemita). I use pork (I buy every year from Walnut Hill Farm in Vermont), but you can use any kind of meat, as long as it is relatively tender and you trim away any tough connective tissue. Chicken or turkey breasts work well.
The trick is to pound the meat thin, so it cooks through in just the time it takes for the breading to crisp and turn brown.
For bread crumbs, make your own by blitzing day-old bread in a blender or food processor until relatively fine — but ideally not powder-fine. (Premade fine bread crumbs like those from Progreso are OK, but not ideal texture, IMO.) Panko is quick and easy!
Serves 2-3 people
1 lb. pork fresh ham steak or loin
~1/2 cup flour
Salt and pepper
2 eggs
~1 cup panko or bread crumbs
~1/2 cup vegetable oil or lard for frying
If necessary, slice meat thinner — start with 1/3-1/2-inch thick pieces, if possible. Then pound the meat so it’s about 1/4 inch thick. A dedicated meat mallet is nice, but you can use, say, the bottom of wine bottle or the edge of a heavy ceramic plate. If using a plate, be careful not to mash deep ridges in the meat, and go back and forth on the meat in different directions. (If using chicken or turkey breasts, don’t slice — just pound.)
Set up an assembly line: 1) a plate with the flour, salt and pepper; 2) a wide shallow bowl with the egg — start with one; you may not need the second — beaten with a fork till the white and the yolk are well blended; and 3) the bread crumbs on a plate. Finally set up a rack (ideally) or another big plate to set the breaded cutlets on at the end.
Dip each slice of meat into flour, then egg, then crumbs. Try to use one hand the flour and crumbs, and the other hand for the egg, to keep your fingers from getting all gummed up.
Let the cutlets sit for 15-30 minutes to dry a bit and let the crumbs kind of glue on.
In a cast-iron or other heavy skillet, heat your oil — you want it about half an inch deep in the pan, or even a little less. Set up a plate with paper towels to put the cooked cutlets on — or a clean rack.
When a little bit of breading sizzles, start easing your cutlets into the oil. Fry for a few minutes on one side, until nice and brown, then flip. The whole process takes maybe six minutes. Keep the oil heat steady by adding a new cutlet each time you take one out, and when you’re near the end, with fewer cutlets, you’ll want to lower the heat on the burner a bit more to compensate.
Serve with another sprinkle of salt and a squeeze of lemon.
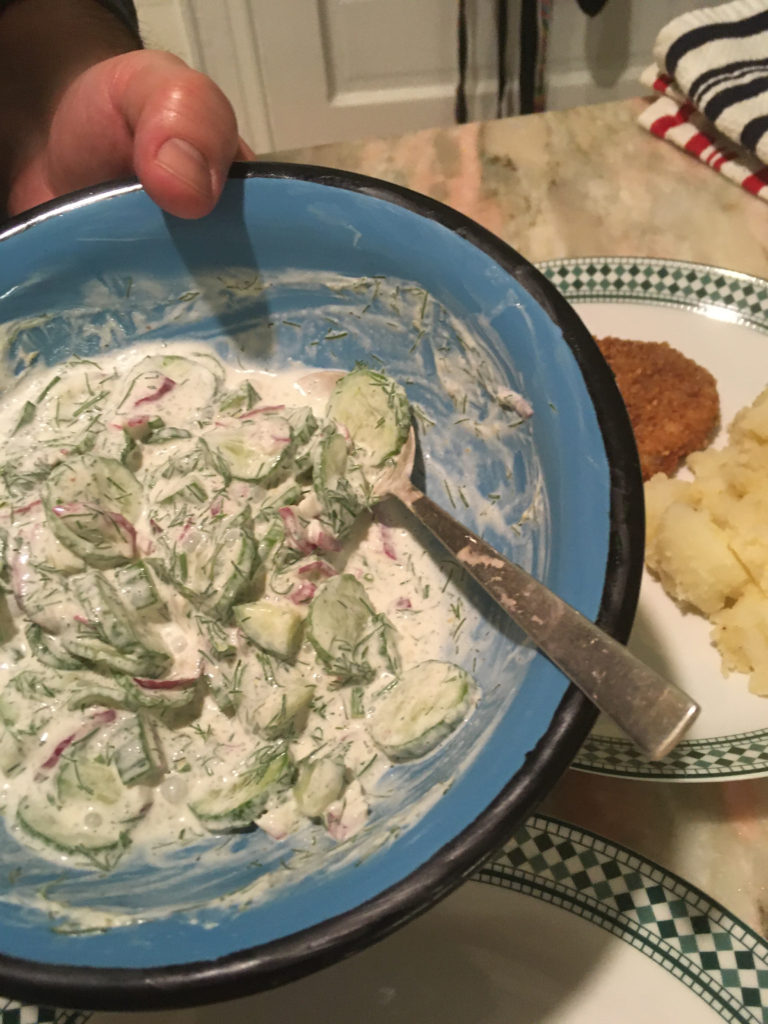 The perfect foil for crispy schnitzel: creamy, sour, a little bit sweet.
This is roughly based on “Tamara’s mom’s cucumber salad,” from the cookbook I wrote with Tamara Reynolds (here), and it’s the standard combo with schnitzel. Generally good in the summer with all kinds of things.
Serves 2 people
2-3 Tbsp sour cream
1 Tbsp red wine or cider vinegar
1 tsp sugar
1/2 tsp mustard
Squeeze of lemon (optional)
Salt and pepper
2 thin-skinned Persian cucumbers
2-3 Tbsp sliced red onion
Big handful fresh dill (or a large pinch dried)
Make the dressing by combining the sour cream, vinegar, sugar, mustard and salt and pepper. (Lemon is optional, but is a bit fresher.) Adjust to taste — you want a little sweetness and a little heat.
Thinly slice the cucumbers in rounds and the onion in paper-thin half rings — just enough onion to give a little color to the salad. Then top with the dressing. Let sit for about 15 minutes, so the cucumbers start to soften. If they sit longer, you may need to adjust the flavors in the dressing again.
Peel (optionally) potatoes and boil them. Add butter and salt when they’re done. Optionally sprinkle some parsley on. Sure, you could do more — but no need, given the rest of this dinner.
A short episode focused just on the principle of ladhera — Greek-style ‘oil-cooked’ vegetables, especially green beans. A good side dish, or a simple, satisfying dinner with bread and cheese.
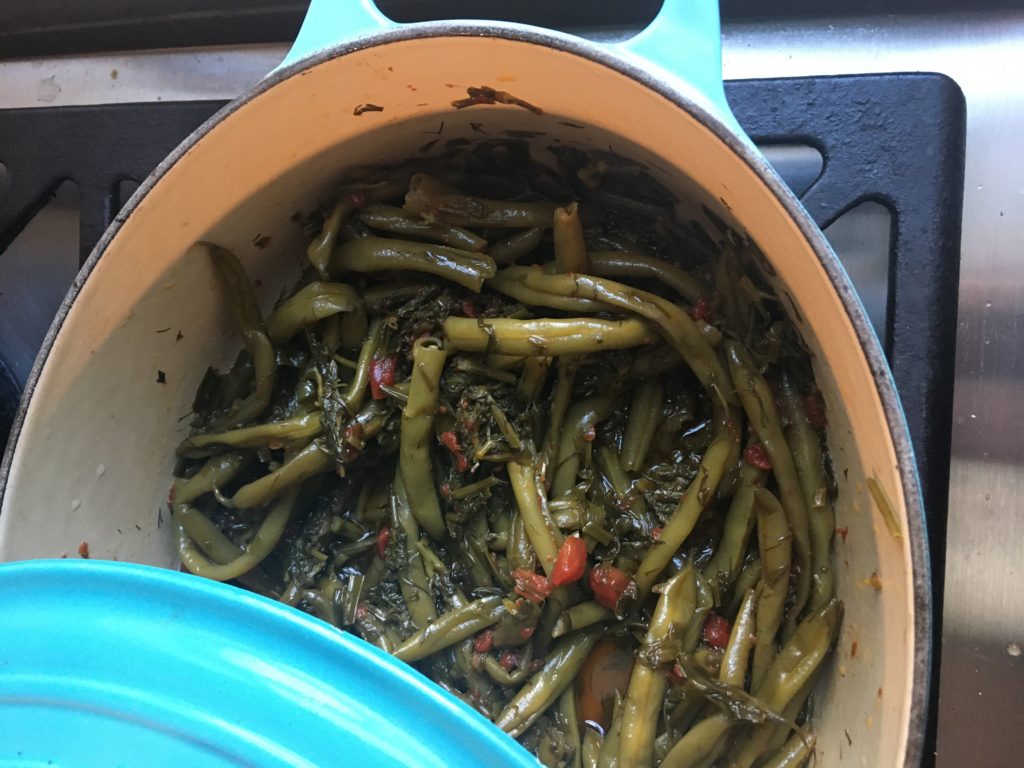 They might not look like much, but these beans taste fantastic!
As I say in the podcast, the vegetables are flexible and so are the proportions, depending on what you have.
Once you have the technique down, you can apply it to all kinds of other things. Use the seasons and what you have as your guide; a common winter dish in Turkey is celery root and carrots. You can do one vegetable or a combo (as in this Turkish summer dish). And you may even start to notice it in more cookbooks and restaurant menus! (It often ends up translated as “oily things” on Greek menus.)
Green beans are classic, and also perhaps the most impressive transformation — they’re completely different from boiled or steamed ones.
For 2-3 portions
Olive oil
1 lb. fresh green beans
1 bunch each fresh parsley and dill
3-4 cloves garlic (or 1 small onion)
1/3 cup diced tomatoes
approx 2 tsp kosher salt
In a heavy pot with a tight-fitting lid, pour in several generous glugs of olive oil. You want a substantial slick on the bottom of the pan.
Rinse and trim the ends off the green beans — no need to dry. Rinse the herbs and rough chop — OK if some stems are in.
Peel and roughly chop the garlic or onion.
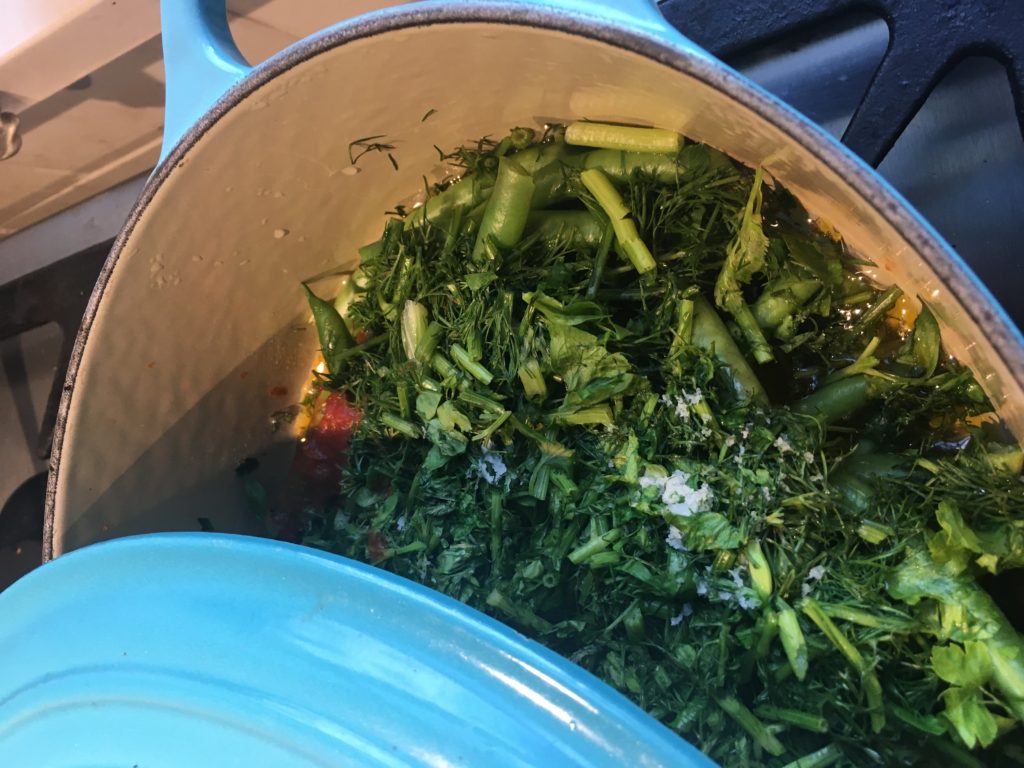 All the ingredients layered in the pot and ready to go.
Heat olive oil briefly, then turn down to medium-low. Add the prepared ingredients in layers, without stirring: garlic, green beans, tomato, herbs. On top, add a substantial amount of salt.
Cover with a lid and turn to the lowest possible heat. Let cook without stirring for 45 minutes. At this point, you can stir and test for doneness — depending on your stove, you might need another 15 minutes or so. Beans should be fully limp and velvety.
You could also bake these in the oven, for about 45 minutes at 300 degrees or so.
Serve at room temperature or lukewarm, with an optional squeeze of lemon (if you like more acidity) and/or another drizzle of olive oil.
Alevropita is a quick baked pie with feta, done in about 20 minutes, and marouli salata (lettuce salad) is a very simple, very springy complement. Together it makes a good light dinner or lunch that comes together in less than 45 minutes (if you’re not busy talking).
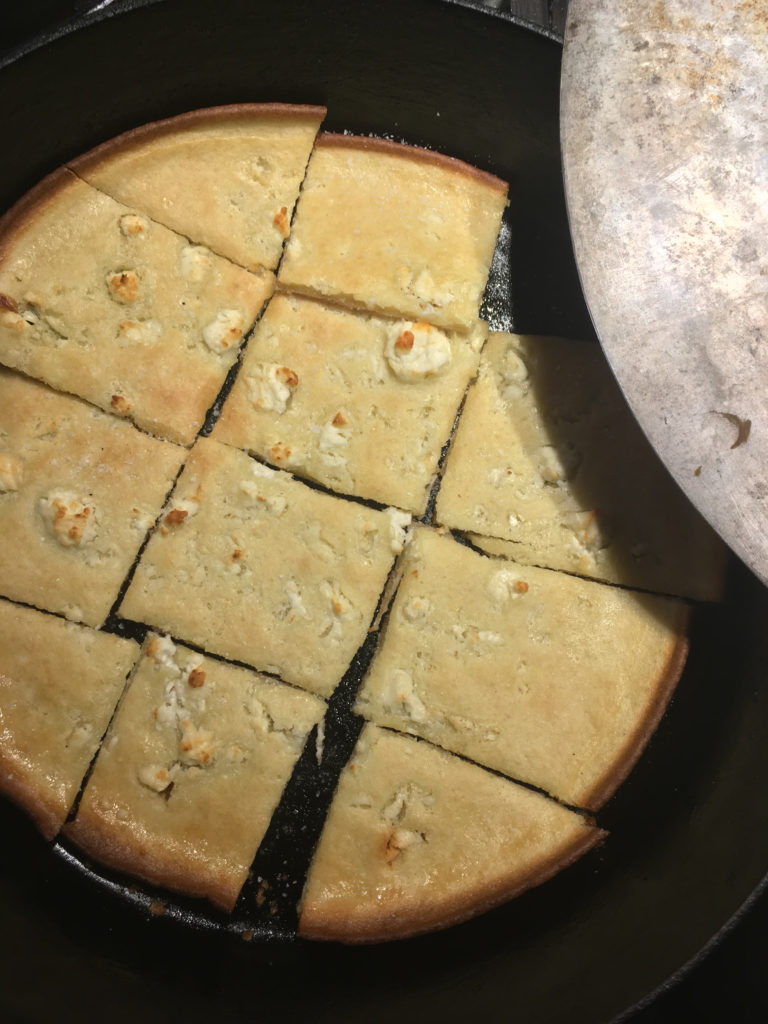 Pita is always cut in squares. Don’t ask me why. I don’t make the rules.
This is a popular snack in northern Epirus, the mountainous region of northwestern Greece. It’s very quick and easy, and it keeps (don’t refrigerate; just cover) for a couple of days. You can also add different toppings (although Greeks never do; it’s always feta), or experiment with different flours. Sourdough starter could sub for some of the liquid and flour.
The only tricky part is figuring out what to cook it in, as you want the batter to spread fairly thin. Probably the thinnest you can go, for this quantity, is two 9-inch skillets, or one large pan with the equivalent area, which is 123 square inches (about 820 square centimeters). Get out your measuring tape and your calculators (area of a circle = pi x radius squared, remember?). Greeks use round pans a lot, but I’ve seen it baked in big rectangular trays too.
For round pans, note that just a small change in diameter makes a relatively large change in area. A 9-inch skillet and an 8-inch skillet, for instance, gives you only 112 square inches. The resulting pitas wind up noticeably thicker and chewier and will take a bit longer to bake.
Serves 2-3
1/2 cup milk
1/2 cup water
1 egg
1 cup flour
large pinch salt
3 oz. feta cheese
3-4 Tbsp butter (sheep or goat, ideally; cow is fine)
Preheat oven to 350 F.
Whisk together the liquid with the egg, then whisk in the flour and salt until the lumps are gone and you have a reasonably thick batter. (The whisk should briefly leave a trail.)
Crumble the feta (or whatever cheese or toppings you’re using) into a small bowl.
When the oven is warm, put your skillets or your large pan in the oven with the butter: 2 Tbsp in each skillet, or, if you’re using one large pan, you probably need only about 3 Tbsp.
When the skillets are hot and the butter is melted, pull them out and divide the batter between them. Scatter the feta or other toppings over.
Bake for at least 15 minutes (thicker pitas will take a bit longer), until the edges are crispy and brown and pulling away from the sides of the pan, and there are a few brown spots on the surface. Ideally, the bottom should be crispy enough that you can pick the whole thing out of the pan.
 Ideal crust, about as thin as you want to go.
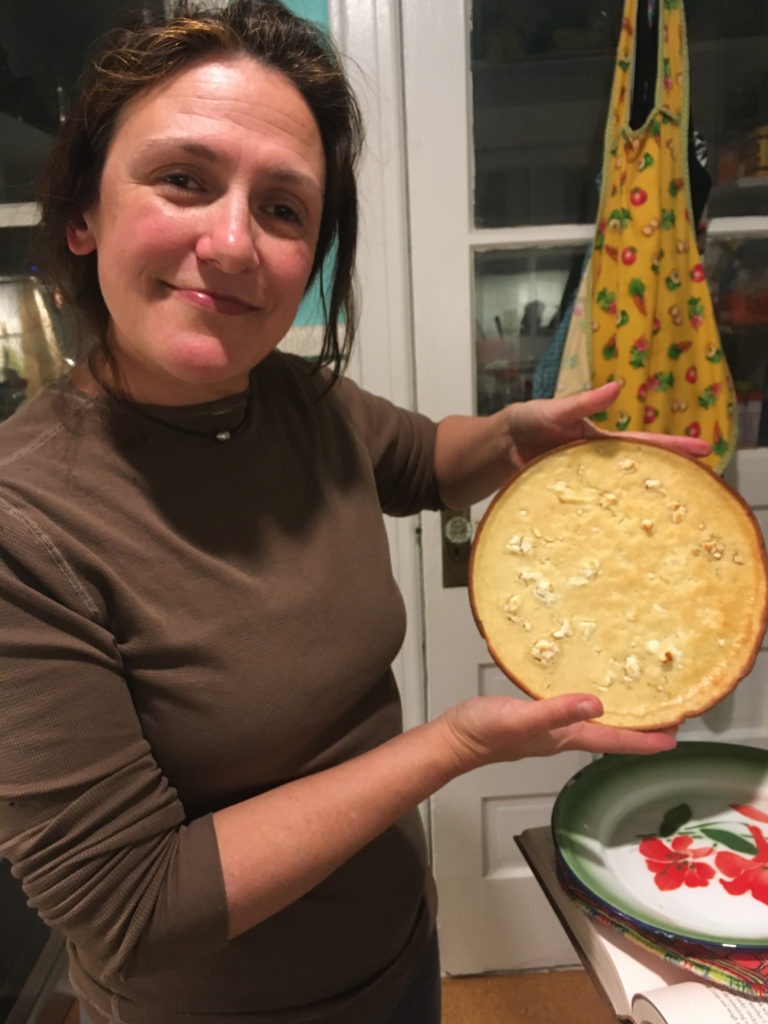 Showing off. If I were a real Greek granny, this would be 3X the size.
 Possibly you could throw a good one like a frisbee.
If you are baking a thicker pita (if you only have a relatively small pan/skillet), or you have used toppings that give off liquid, you may want to finish by browning the surface under the broiler.
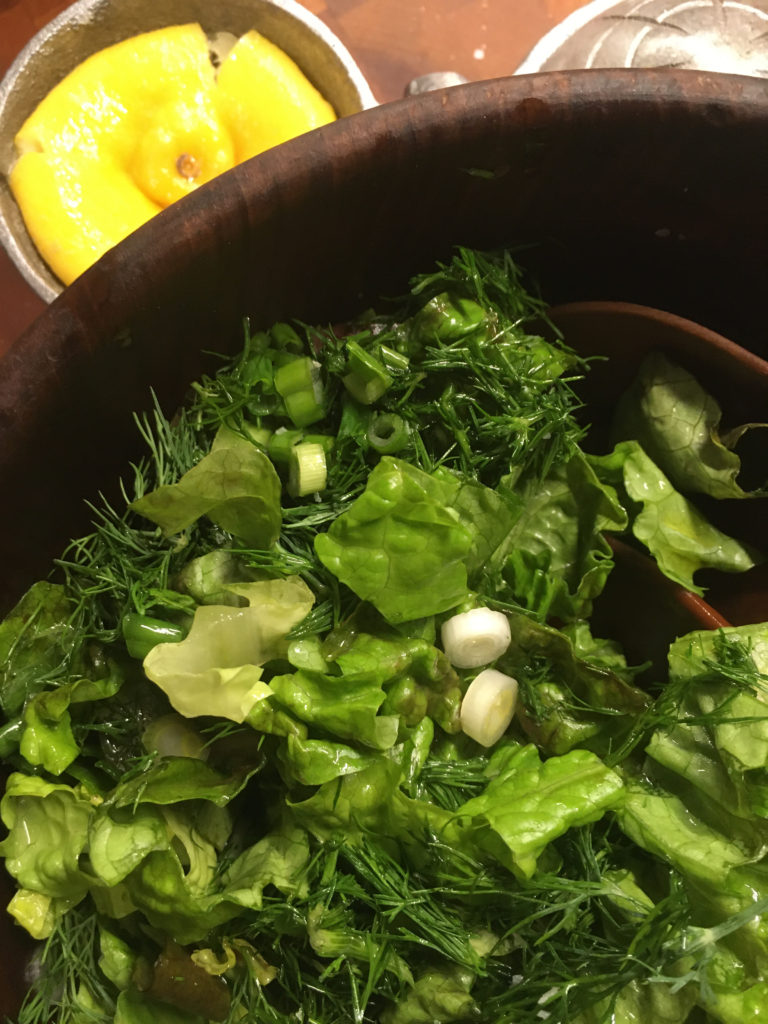 Marouli salata: spring in a bowl, basically.
Simple, green, but not dull. A real testament to how slicing things a specific way can make all the difference. If you only have dried dill, try soaking it in the lemon juice while you prep the rest of the salad, to rehydrate it a bit.
Serves 2-3 people
Half a head of freshest lettuce
Big handful fresh dill
2-3 green onions or chives
Olive oil
Half a lemon
Salt and pepper
Rinse and dry your lettuce, then stack the leaves and slice crosswise into ribbons, between 1/4 and 1/2 inch wide. (That’s it! That’s the trick.)
Chop your dill roughly (perfectly OK if some of the stems get in) and slice up your green onions (white and green parts both) and add to the lettuce. Drizzle generously with olive oil, toss and add salt and pepper. Finish by squeezing half a lemon over and tossing again.
A special short episode on the simplest and best way to prepare artichokes, which are in season now. Accidental music credit: Peter Moskos, practicing his autoharp downstairs.
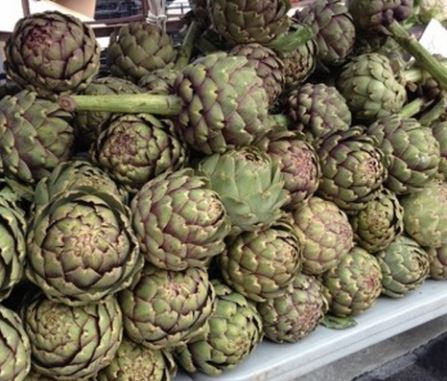 Sorry, stock photo because I already ate our own artichokes!
The only secret here is salt. Heavily salted water is what brings out the distinctive tongue-numbing effect of artichokes. So set a big pot of water on to boil; add even more salt than if you were boiling pasta — like several tablespoons.
While the water is heating, trim the artichokes. Optionally, prepare a bowl of cold water with a couple of glugs of vinegar, or a good squeeze of lemon juice. Storing the cut artichokes in this acidulated water will help keep the cut surfaces from turning black.
With a heavy knife, cut off the top inch or so of each artichoke. Then with scissors, trim the pointy thorn ends off the remaining outer leaves that are below where you made the cut. Trim any tiny leaves off the stalk, and then cut just the smallest bit off the end of the stalk, just to cut away whatever is dry or brown (the stalk is delicious; you don’t want to waste it).
Optionally then slice the artichokes in half vertically — this gives you more flexibility on portions, and it’s also easier to check when the artichokes are done cooking. If you’re doing this, though, you definitely want to dunk them in acidulated water.
Put them in the boiling water cut side down if sliced in half; if they’re whole, you can put a small plate in on top to keep them submerged. Boil for about 10 minutes, and then start checking for doneness. If still whole, you can try pulling off a leaf — if it comes easily, it’s done. Or you can poke a knife in to the heart, at the base of the stalk. If it slides in easily, it’s done. If you’ve cut your artichokes vertically, you can poke into the heart directly. You can also see the color of the heart change, from light to dark. If in doubt, err on the side of cooking more, as not-quite-done leaves are a chore to nibble the ends off.
While the artichokes are boiling, melt some butter. About 2 tablespoons for person/artichoke is plenty. You can also make some garlic mayo. It’s nice to squeeze a clove of garlic into about a tablespoon of lemon juice and let that sit, to take the burning edge off the garlic, then mix that in with a good-size dollop of mayonnaise. This makes it a bit more of a runny sauce, rather than straight globby mayo (although some people like that just as well!).
For truly pedantic instructions on how to eat the damn things, you’ll have to listen!
Your feedback is valuable to us. Should you encounter any bugs, glitches, lack of functionality or other problems, please email us on [email protected] or join Moon.FM Telegram Group where you can talk directly to the dev team who are happy to answer any queries.
 Local Mouthful: A podcast about food and home cooking
 GardenFork.TV Make, Fix, Grow, Cook
 Cooking with Paula McIntyre
 Cooking Everything Outdoors
 The Kitchen Counter - Home Cooking Tips and Inspiration
 What's Cooking with Paula Deen